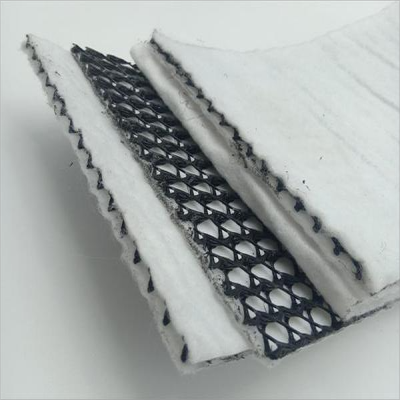
Geocomposite drainage network It is a geosynthetic material that integrates the functions of drainage, filtration, reinforcement and so on.
1. Construction preparation stage
1、Clean up the grassroots
Laying geotechnical Composite drainage network Before, we should clean up the grassroots level. It is necessary to ensure that the surface of the base layer is clean, free of debris and sharp protrusions, and it is also kept dry. This is because any impurities or humid environment may affect the laying effect and performance of the drainage net.
2、Determine the drainage network location
Accurately measure and mark the location and shape of the drainage net according to the design requirements. This step is crucial for the subsequent construction because it is directly related to the laying quality of the drainage network and the engineering effect.
2. Laying drainage network stage
1、Laying direction
Geocomposite drainage networks must be laid down the slope, ensuring that the length direction is along the direction of water flow. For long and steep slopes, special attention should be paid to use only full length material rolls at the top of the slope to avoid performance degradation due to improper cutting.
2、Cropping and overlapping
During the laying process, if you encounter obstacles, such as discharge pipes or monitoring wells, cut the drainage net and lay it around the obstacles to ensure no gap. The cutting of the drainage net should be accurate to avoid waste. The overlapping part of the drainage network should be carried out according to the requirements of the specification. Generally, the overlapping part of the adjacent sides in the length direction is at least 100 mm, The lap length in the width direction is not less than 200 mm, Also use HDPE Plastic straps are tied to ensure a secure connection.
3、Laying flat
When laying the drainage net, keep the net surface flat and wrinkle-free. If needed, you can use a rubber hammer to gently tap it to tightly bond with the base layer. Do not step on or drag the drainage net during laying to avoid damage.
3. Connecting the drainage pipe stage
According to the design requirements, the drainage pipe is connected to the geocomposite drainage network. The joints should be secure and watertight, and should be treated with suitable sealing materials. During the connection process, the drainage net should also be protected from damage.
4. Backfill soil and tamping stage
1、Sand filling protection
Fill the drainage net and drain pipe connection with an appropriate amount of sand to protect the drainage net and connection from damage. When filling sand, it should be uniform and dense to avoid cavities or looseness.
2、Backfill soil and tamping
After filling the sand, the backfill operation is carried out. Backfill soil should be carried out in layers, and the thickness of each layer should not be too thick to facilitate compaction. During the tamping process, the strength should be controlled to avoid excessive pressure on the drainage network. Also check whether the drainage network is displaced or damaged due to backfill soil, and deal with it promptly if found.
5. Acceptance stage
After the construction is completed, strict acceptance work should be carried out. The acceptance includes checking whether the laying of the drainage network meets the design requirements, whether the connections are firm, whether the drainage is smooth, etc. If any problem is found, it should be dealt with in time and re-accepted until it is qualified.
Post time: Feb-22-2025


